Home Office Posture Guide: Essential Education and Exercises for Desk Workers
Comprehensive postural education and evidence-based exercises designed specifically for remote workers to prevent pain, improve posture, and maintain long-term musculoskeletal health.
Damian Jankowski, PT, DPT, MBA
January 15, 2026
12 min read
Understanding Postural Dysfunction in Desk Workers
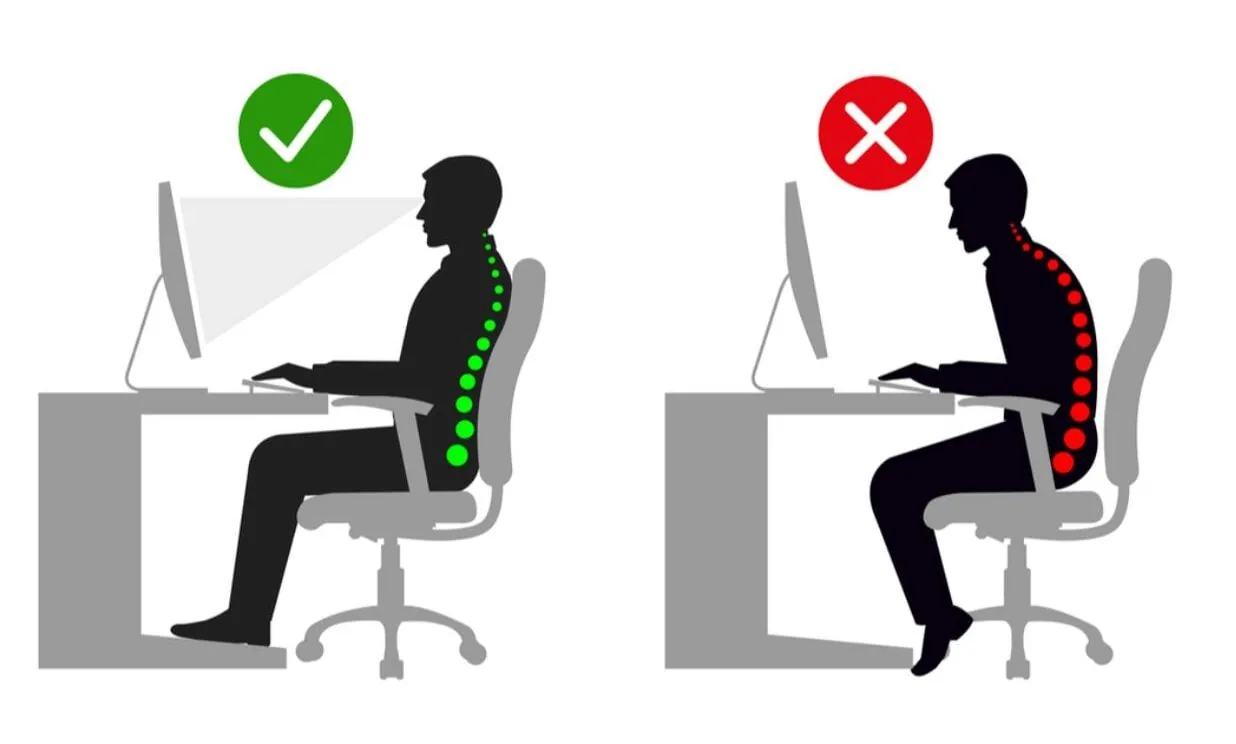
Prolonged sitting at a desk creates predictable patterns of muscle imbalance and postural dysfunction. The most common pattern, known as "Upper Crossed Syndrome," involves tight pectoralis muscles, tight upper trapezius and levator scapulae, with weak deep neck flexors and weak lower trapezius/serratus anterior muscles. This leads to forward head posture, rounded shoulders, and thoracic kyphosis (upper back rounding).
Additionally, "Lower Crossed Syndrome" develops from prolonged sitting, characterized by tight hip flexors and lumbar erectors combined with weak abdominals and gluteal muscles. This creates an anterior pelvic tilt and increased lumbar lordosis (lower back arch), contributing to low back pain and reduced core stability.
This is for educational purposes only and is not considered professional medical advice. Always follow the guidance of your healthcare providers regarding your specific condition and recovery plan or contact a physical therapist for a personalized evaluation.
The Science of Optimal Sitting Posture
Proper sitting posture maintains the spine's natural curves while minimizing compressive forces on intervertebral discs and reducing muscular strain. The ideal seated position includes:
- Lumbar Lordosis Maintenance: Your lower back should maintain a gentle forward curve (lordosis), supported by a lumbar roll positioned at the belt line. This reduces disc pressure by up to 30% compared to slouched postures.
- Neutral Pelvic Position: Sit on your "sit bones" (ischial tuberosities) with pelvis in neutral, avoiding posterior pelvic tilt which rounds the lower back and increases disc pressure from 100kg to 185kg.
- Thoracic Alignment: Upper back should be upright but not rigidly extended. Think "proud chest" without arching your lower back excessively.
- Cervical Retraction: Head positioned directly over shoulders, not forward. For every inch your head moves forward, it adds 10 pounds of strain on neck muscles and cervical spine structures.
- Shoulder Blade Position: Scapulae should be gently retracted and depressed (down and back), not elevated or protracted forward.
- Hip and Knee Angles: Both hips and knees bent to 90-100 degrees, with feet flat on floor or footrest. This optimizes hip flexor length and reduces lumbar strain.
Comprehensive Home Office Ergonomic Setup
Your physical workspace directly influences your ability to maintain proper posture. Here's a detailed setup guide:
- Chair Height and Depth: Adjust so feet are flat on floor with knees at 90-100° flexion. Hip height should be equal to or slightly higher than knees to maintain neutral pelvic tilt. Seat depth should allow 2-3 finger width clearance between seat edge and back of knees to avoid restricting circulation.
- Lumbar Support: Position lumbar roll or chair's lumbar support at your belt line (L4-L5 level). The support should create gentle forward pressure, maintaining your natural lordotic curve. A rolled towel 4-5 inches in diameter works well if your chair lacks built-in support.
- Armrest Position: Set armrests so shoulders remain relaxed (not elevated) with elbows at 90° flexion. Armrests should support forearms without requiring shoulder elevation, which can trigger upper trapezius overactivity and tension headaches.
- Monitor Height and Distance: Top third of screen should be at eye level when sitting upright, positioned 20-28 inches away (arm's length). This prevents forward head posture and reduces eye strain. For bifocal users, lower monitor 1-2 inches to avoid cervical extension.
- Keyboard and Mouse Placement: Position keyboard so elbows remain at 90-100° flexion with wrists in neutral (not extended or flexed). Mouse should be at same height and within easy reach to prevent shoulder abduction and reaching patterns.
- Document Holder: Use a document holder positioned between keyboard and monitor at same height as screen to minimize repetitive neck rotation and flexion when referencing papers.
- Lighting: Position light source to eliminate screen glare (typically to the side or behind you). Proper lighting reduces forward head posture adopted to read screens and prevents eye strain.
Essential Postural Exercises - Hourly Micro-Breaks (2-3 Minutes)
These exercises should be performed every hour to counteract sustained postures. Set a timer reminder.
1. Chin Tucks (Deep Neck Flexor Strengthening)
Purpose: Strengthens deep neck flexors and counteracts forward head posture.
Instructions: While sitting upright, keep eyes level and gently glide chin straight back (imagine making a double chin) without tilting head up or down. You should feel lengthening at the back of your neck. Hold 5 seconds. Perform 10 repetitions every hour.
Progression: Once mastered sitting, perform lying on back with head on pillow, pressing head into pillow while performing chin tuck.
2. Scapular Retraction and Depression
Purpose: Activates lower trapezius and rhomboids while stretching pectoralis muscles.
Instructions: Sit upright, arms at sides. Squeeze shoulder blades together and down (as if trying to put shoulder blades in opposite back pockets). Hold 5-7 seconds while breathing normally. Avoid shrugging shoulders upward. Perform 10 repetitions every hour.
Key Points: Focus on downward motion of shoulder blades, not just backward. This targets the often-weak lower trapezius muscle.
3. Seated Thoracic Extension Over Chair
Purpose: Mobilizes thoracic spine into extension, counteracting rounded upper back posture.
Instructions: Sitting upright, interlace fingers behind head. Gently arch backward over the chair's backrest, focusing movement in mid-back (not neck or lower back). Breathe deeply into chest. Hold 10-15 seconds. Perform 3-5 repetitions every hour.
Safety Note: Keep head supported with hands. Only extend as far as comfortable without pain.
4. Seated Hip Flexor Stretch
Purpose: Stretches iliopsoas and rectus femoris, preventing hip flexor tightness from prolonged sitting.
Instructions: Scoot to front edge of chair. Place right leg back with top of foot on floor behind you (or toes tucked under). Keep left foot flat on floor in front. Gently tilt pelvis backward (posterior tilt) and shift weight forward until you feel stretch in front of right hip. Hold 30-45 seconds each side.
Alternative: If unable to perform seated, stand and perform traditional kneeling hip flexor stretch during breaks.
How Touchpoint PT Can Help
At Touchpoint PT, we take a comprehensive approach to addressing your low back pain and overall musculoskeletal health. Our team of experienced physical therapists can help you by:
- Free consultation: We offer a free 10-minute initial consultation to discuss your goals and determine if telehealth PT is the right fit for you.
- Core and Extremity Strength Assessment: Our therapists evaluate the strength and stability of your core and extremities to develop a personalized exercise plan that supports your spine and reduces strain.
- Specialized Education: We provide tailored guidance on workplace and home environment modifications to optimize ergonomics, reduce pain, and prevent future injuries.